Posts filed under ‘Seafood’
Fish Chowder

I love fish chowder.
When I was a kid, it was my favorite dish that my mom’s cooking. I even found my old diary from elementary school, and in the beginning it had a fill in the blank section where you listed your favorite things, and for favorite food I wrote, “Mom’s fish chowder”. Incidentally, one of my brother’s hated this soup as a kid, but only because he hated carrots (he still hates carrots as a matter of fact…).
It’s a a very simple soup, but really good. The secret is the seasoning. You use one package of the Ranch Buttermilk Salad Dressing spice mix as the seasoning of the soup. If this sounds odd, trust me, it’s not. It doesn’t make the soup taste like ranch dressing either. It just gives it great flavor.
And it goes great with plain scones (made the same as my dark chocolate chip walnut scones, just without the chocolate and walnuts) with honey and butter on them. That’s how my mom always served it. Ah, memories!

To start, chop up a whole onion, a few carrots, and a few potatoes, and saute them in some butter or olive oil in a large pot for about 8 – 10 minutes.

Add as much fish as you want, but on average use 15 – 16 oz. boneless skinless white fish fillets. Saute them in a skillet with some butter or olive oil until slightly browned, then flip them and cook them on the other side until cooked through and flaky.

Add two cups of water and the fish to the vegetables. Break up the fish into chunks with your spoon, and turn up the heat. Bring the soup to a boil then turn down the heat so it’s just simmering, cover the pot, and let it summer until the vegetables are tender, about 5 – 8 minutes.

Whisk together two cups of milk (or 1 1/2 cups milk and 1/2 cup cream or half and half) with the contents of one package of Ranch Buttermilk Dressing mix. Pour the mixture into the soup, mix well, adjust the seasoning to taste, and then heat the soup through before serving.

Fish Chowder
(serves 4 – 6)
- 3 Tbsp. butter or olive oil
- 1 large onion, chopped
- 2 large russet potatoes, chopped
- 2 carrots, chopped
- About 16 oz. boneless skinless white fish fillets
- 2 c. water
- 2 c. milk (or substitute 1/2 c. of the milk with cream or half and half)
- 1 package Ranch Buttermilk Dressing mix
- Saute onion, potatoes, and carrots with 2 Tbsp. butter in a large pot over medium heat for 8 – 10 minutes.
- Saute fish fillets with 1 Tbsp. butter in a skillet over medium heat until fish has slightly browned on one side. Flip the fillets and cook on the other side until cooked through and flaky.
- Add water and fish fillets to the pot with the vegetables and turn up the heat. When mixture starts to boil, reduce heat, cover, and simmer until vegetables are tender, 5 – 8 minutes. Remove from heat.
- Whisk together milk (and cream/half and half if using) and dressing mix in a small bowl. Pour mixture into the soup, mixing evenly, and then return soup to heat and cook until heated through. Adjust seasoning to taste and serve.
Okonomiyaki (Japanese savory meat and vegetable pancake) お好み焼き
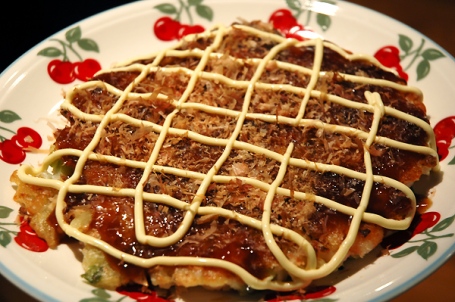
Have you ever had Japanese okonomiyaki? It’s a very common food in Japan.
The name basically means “grilled as you like it” “what you want grilled”, and it’s basically a savory pancake of sorts. The batter and toppings vary according to region, but it’s basically a batter of flour and water or broth with finely shredded cabbage, green onions, and whatever meat or seafood you want in it. There’s a lot of variations, but that’s it in it’s most basic form.
On top of the finished okonomiyaki is usually a layer of okonomiyaki sauce (available in most Asian markets), a sauce similar to Worcestershire sauce, but thicker and sweeter, aonori (finely crushed seaweed flakes), katsuobushi (bonito fish flakes), and Japanese mayonnaise.
If you’re unfamiliar with Japanese cuisine, you may be thinking, “Seaweed flakes? Fish flakes? The heck?!” But the seaweed flakes have great flavor. To get bonito flakes, the beheaded, gutted, and filleted fish is simmered, smoked, and then dried. It becomes hard which makes it easy to cut very thin flakes off of it. They have the flavor of smoked fish. Very tasty. Trust me.
Also, if you want to be really authentic, get Japanese mayonnaise for this. You can find it at most Asian markets. The most famous brand of Japanese mayonnaise is “Kewpie Mayonnaise”. Japanese mayonnaise tastes different than American mayonnaise, so if you’re feeling adventurous, want your okonomiyaki to be really authentic, or you’re like my husband and think American mayonnaise tastes icky, get ya some Kewpie mayonnaise.
For this recipe I made a pretty standard okonomiyaki with shrimp in it. Unfortunately, I was out of aonori (that’s why there’s no green on top of my finished okonomiyaki), but I’ve included it in the recipe.
This makes two large okonomiyaki (probably enough for 3 – 4 people), so feel free to adjust the amounts for the number of people you’re cooking for.
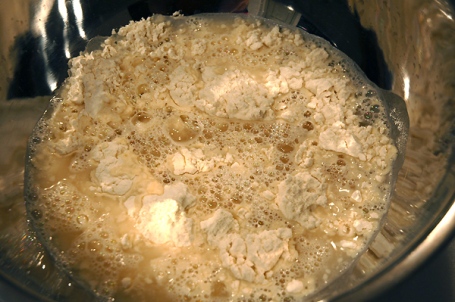
First mix 1 1/2 cups of flour and 1 1/2 cups of dashi (Japanese broth – you can find them in powdered form in most Asian grocery stores) or water. Mix it all up until you have a nice, lump-free batter.
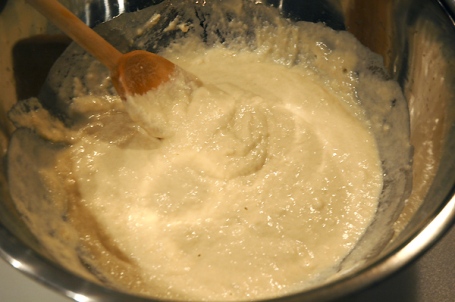
Like so. It should be about the consistency of pancake batter. If it’s too thick or too thin, feel free to add more flour or water as necessary.
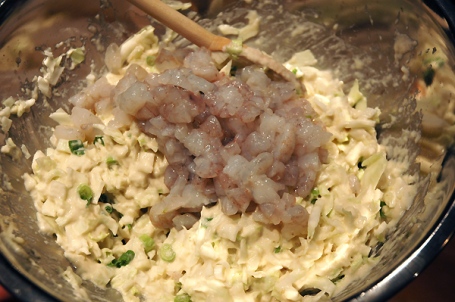
Add 3 cups of diced cabbage, 3 or 4 diced green onions, and about 1 1/2 – 2 cups diced raw shrimp (peeled and de-veined), and mix.
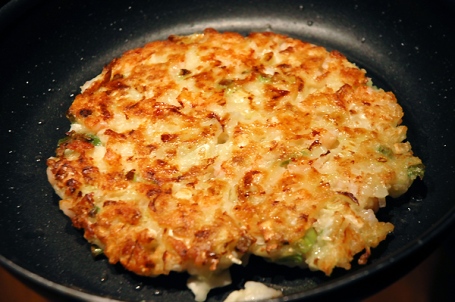
Heat a couple of tablespoons of olive oil in a large skillet over medium high heat, and spoon half the batter onto it. Use a spoon to smoosh it out into a circular shape about 1/2 – 3/4 and inch in thickness. Cook the okonomiyaki until it’s golden brown on one side, then (very carefully) use two large spatulas to flip it over and cook it on the other side until it’s golden brown. Repeat with the remaining batter.
Hint: If you don’t think you can flip it, and it is a bit tricky, use a spatula to cut it in half, then flip each half over.
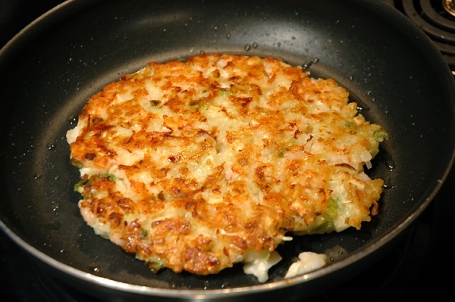
If you want to give it a little extra something, add a little sesame oil along with the olive oil when you cook it. If you’ve never had it, sesame oil has fabulous flavor and aroma. Don’t use nothing but sesame oil though, as its flavor would overpowering the okonomiyaki, and sesame oil doesn’t handle high temperatures well.

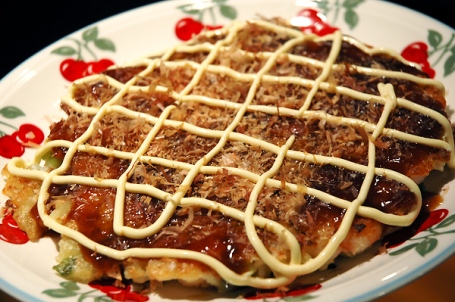
Remove the finished okonomiyaki to a plate, drizzle some okonomiyaki sauce on it, spread it into an even layer with a spoon, sprinkle some aonori and katsuobushi (the bonito fish flakes) over it (if you want of course), and then drizzle some mayonnaise on top (again, optional), and dig in.
Okonomiyaki
(makes two large pancakes, enough for 3 – 4 people)
- 1 1/2 c. unbleached all-purpose flour
- 1 1/2 c. dashi broth or water
- dash of salt
- 3 c. diced cabbage
- 3 – 4 green onions, diced
- 1 1/2 – 2 c. diced raw shrimp (peeled and de-veined)
- 2 Tbsp. extra virgin olive oil (plus one tsp. sesame oil – optional)
- okonomiyaki sauce
- aonori (seaweed flakes) (optional)
- katsuobushi (bonito flakes) (optional)
- Mayonnaise (optional)
- In a large bowl, mix the flour, a dash of salt, and dashi together until smooth. Add the cabbage, onions, and shrimp, and mix until well combined.
- Heat oil in a large skillet over medium-high heat. Spoon half the batter into the skillet and use a spatula to form it into a circular shape about 1/2 – 3/4 inch thick. Cook on one side until golden brown, then use two spatulas to flip it over, and cook on the remaining side until golden brown. Remove to a plate, and repeat with the remaining batter.
- To serve, drizzle okonomiyaki sauce over the finished pancake, then spread it around evenly with a spoon. Sprinkle aonori and katsuobushi over it, and then top it off with mayonnaise drizzled over the top (if using).
Baked Fish Fillet Sandwiches

I’m so glad it’s Friday!!
Between going to school part time, and working part time, I’ve become busy full time! This probably seems like a fairly obvious observation, but it’s true nonetheless.
Yay Friday!
When I was kid, we sometimes went to McDonald’s. I’ve always hated their hamburgers, so when I was a kid, I would get their fish fillet sandwich. I thought it was pretty good, and it didn’t gross me out like their hamburgers did.
Fast forward to now. I haven’t been to McDonald’s in a loooong time (I generally try to avoid fast food), but I started thinking about those fish fillet sandwiches I used to get as a kid. I thought it would be fun to make, so last week I got some frozen cod fillets, and made Hisa and I baked fish fillet sandwiches for supper.
I didn’t want to fry them, so I prepared it the same as my baked fishsticks, except for cutting them into sticks, and then simply made them into sandwiches.
This is a very easy, straight forward recipe, so it’s good for a busy night, when you don’t have much time or you’re too exhausted to be bothered.
I recommend cod for this recipe, but any firm white fish will work fine.

Baked Fish Fillet Sandwiches
(serves 4)
- 4 sandwich size fillets of cod (as big or as little as you want)
- 1 – 2 c. flour
- 1 egg, beaten
- 2 c. panko bread crumbs
- salt and pepper
- tartar sauce
- 4 hamburger buns
- butter for buns
- sliced cheese (optional)
- lettuce (optional)
- Pre-heat the oven to 400° F (200° C). Spray a cooking sheet with non-stick spray or line with parchment paper.
- Rinse and pat dry fish fillets.
- Add the four, beaten egg, and panko individually to three small bowls. Dip each fish fillet, being sure to coat both sides, into the flour, the egg, and the panko, in that order. Place on the prepared baking sheet.
- Bake fish for 30 minutes, or until golden brown.
- Spread butter on each hamburger bun half, then toast until buttered side is golden brown.
- To assemble: spread tartar sauce on one or both hamburger buns. Place one fish fillet on bottom bun, then top with sliced cheese, lettuce, and the top bun. Serve.
Walnut Crusted Dijon Salmon
Wow. What a crazy week it’s been! This was my second week of school, and the first week of my new part-time job, so between the two, I’ve been busy full-time this week! I think I’m sort of kinda getting back in the groove of waking up at 6:30 am each morning (getting used to, but not liking). Fridays are the only day I don’t have any classes, so it’s a chance for me to catch up on things here at home (i.e. laundry, cleaning, making yogurt/bread, etc.).
I’m still really liking my classes, but man, three-hour classes are loooooong. I always kinda feel like my brain has died by the time they’re over. Still, I think I’m going to learn a lot, so I’m enjoying myself.
Let me back up a little though!
We had a lot of fun on Labor Day Weekend. Saturday, we went to Braozs Bend State Park to see…the alligators! Yes, the park is known for its large population of wild alligators that you can see roaming around the park. Neither of us had ever seen a wild alligator, so we went there to go on some of the trails and hopefully see alligators.
It was kinda funny, really, because there were signs everywhere with warnings about the alligators that said things like, “Stay at least 30 feet away from the alligators,” “Avoid areas of tall grass and gradual embankments as alligators are often in these areas”.
Now, the reason this is funny, is because the trail we went on was a gravel trail about 4 feet wide that was surrounded on either side by tall grass and gradual embankments into the water. We were never more than 8 feet away from the water, so we couldn’t very well avoid the tall grass areas and we sure couldn’t be 30 feet away from any alligators lurking nearby.
It was like high risk hiking. It was fun, but I was constantly checking for alligators, so I wouldn’t really say it was relaxing. I spotted 3 alligators on the trail, one of which was at least 10 feet long. One, I was taking a picture of the scenery, and when I looked down, there was an alligator in the water watching me. Freaky? Oh yeah. Freaky, but fun. I’m weird like that.

No, I won’t hurt you. Come closer my pretty…
Sunday, we rested at home mainly (that and grocery shopping), but Monday we went to Galveston to the beach and swam. I haven’t swam in the ocean since we were in Hawaii for our wedding, so I was excited. We took some food with us and swam for awhile, ate lunch, swam some more, got frozen yogurt at an Orange Leaf located conveniently right next to the beach, and then headed home. We weren’t there all afternoon or anything, but we were both exhausted by the time we got home.
Something about swimming in the ocean is very tiring. I suppose it’s all that getting pushed around by the waves. I managed to get sunburned despite being super diligent about wearing sunblock (What can I say, I have super fair skin), so now I have a funky bikini tan line. All part of summer, right? Be both had a great time though. I’m happy we were able to go to the beach and swim before the end of summer. Of course, here in Houston, the end of summer probably isn’t until, oh, maybe the end of October.
All in all, it was a great weekend!
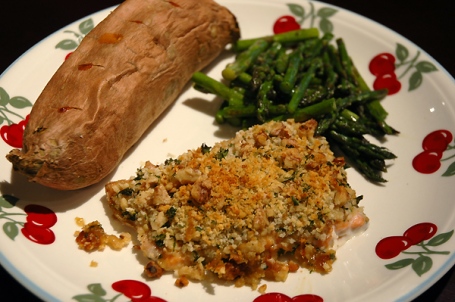
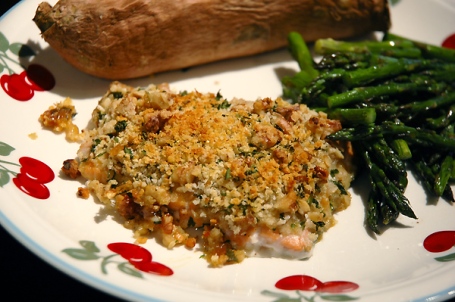
I’m always on the lookout for new fish recipes. Especially non-complicated fish recipes. I like to keep it interesting, but simple. I got the idea for this recipe from pecan-crusted trout, which I love. I saw somewhere a recipe for walnut-crusted salmon, which I’d never heard of. I was intrigued by the idea of it though, so I created my own version, which turned out very nicely. I thought just a walnut crust would be a bit boring, so I coated the salmon in a simple honey-dijon sauce, then coated the top in a walnut and panko crust.
The result? Delicious. This is a very fast main dish to throw together, but looks and tastes like something from a fancy restaurant.
One tip: As salmon fillets come in different sizes and thicknesses, Cook your fillets 10 minutes per inch of thickness. It they’re only an inch thick or less, 10 minutes should be plenty. It they’re thicker, adjust the cooking time accordingly.

Walnut Crusted Dijon Salmon
(serves 4)
- 4 individual size salmon fillets
- 1/2 c. chopped walnuts
- 1/2 c. panko bread crumbs
- 1 Tbsp. dried parsley
- 2 Tbsp. dijon mustard
- 2 Tbsp. honey
- 2 Tbsp. melted butter
- salt and pepper
- Pre-heat oven to 400° F. Spray a large baking sheet with non-stick spray.
- Rinse and pat salmon fillets dry. Place on baking sheet. Season with salt and pepper.
- In a plastic ziplock bag, add chopped walnuts, panko, and parsley. Seal bag and shake for several seconds.
- In a small bowl, combine mustard, honey, and melted butter, and mix until smooth.
- Pour mustard mixture over the tops of the salmon fillets. Use a spoon to spread it around evenly. Carefully spoon bread crumb mixture on top of fillets until covered. Gently press down on crumb mixture to prevent it from falling off.
- Bake fillets 10 minutes per inch of thickness, or until cooked through and walnut crust is golden brown.

Fajita Shrimp and Veggie Quesadillas

I love quesadillas.
Who doesn’t love quesadillas though, right? It’s like a Mexican grilled cheese sandwich, but somehow better than a grilled cheese sandwich. Kids love em. Adults love em. I suppose someone who doesn’t like cheese probably wouldn’t like them, but… I don’t understand how someone can’t like cheese, so there ya go. It’s like not liking chocolate… *shudder*

These quesadillas are easy to make and fast, but they taste like restaurant quesadillas and fajitas in one. In other words, really really good.
I used shrimp for these, but you can use chicken, beef, etc. Whatever meat you chose, you cook it in enchilada sauce. I use my own homemade enchilada sauce (also easy to make), but you can use the canned stuff if you want.
Fajita Shrimp and Veggie Quesadillas
(serves 2)
- 6 oz.(approximately) small to medium size shrimp (raw, de-veined, and peeled)
- 1 1/2 c. enchilada sauce
- 2 Tbsp. extra virgin olive oil
- 1/2 large onion, sliced
- 1/2 red bell pepper, sliced
- 1/2 green bell pepper, sliced
- salt and pepper to taste
- 1 c. shredded Colby and Monterrey Jack cheese (any kind of shredded cheese is fine)
- 4 soft taco size flour tortillas (or 2 burrito size tortillas)
- salsa, sour cream, and guacamole for serving (optional)
- Chop shrimp into small pieces. Add the shrimp and enchilada sauce to a bowl. Mix until shrimp is well coated. Set aside.
- Heat a large skillet over med-high to high heat. Add oil. Add onion, red bell pepper, and green bell pepper. Let cook for about a minute without stirring. After a minute begin stirring around. Continue cooking on high heat until vegetables become tender, browned, and even a little blackened in places. Season with salt and pepper to taste, and remove from heat.
- Reduce heat to medium. Add shrimp and enchilada sauce to skillet. Saute until shrimp is cooked through. Remove shrimp with a slotted spoon to a bowl. Discard leftover enchilada sauce.
- Heat a clean non-stick skillet over med-high heat. Spray with non-stick spray.
- Place one tortilla in the skillet. On top of the tortilla, spread 1/4 c. cheese, 1/2 the veggie mixture, and then another 1/4 c. cheese, in that order. Place another tortilla on top, and gently press the tortilla down with a spatula.
[note: If using burrito size tortillas, place cheese and veggies on one half of the tortilla, then fold over the other half and press it down.] - After the bottom of the tortilla has browned and the cheese is melting (3 – 4 minutes), carefully flip the quesadilla. Brown on the remaining side another 3 – 4 minutes. Remove to a cutting board, and cut into fourths. Repeat with remaining tortillas, cheese, and veggie mixture.
- Serve with salsa, sour cream, and guacamole.
