Posts tagged ‘asian food’
Five Spice Chicken and Noodle Stir-fry

I have a confession.
Stir-fries make me a little nervous.
Why you ask?
All that heat!
You have to cook everything very quickly, and at a really really high temperature.
The result?
Spitting oil,
excessive smoke,
smoke detector going off,
DOOM!
At least, that’s pretty much how it goes in my head.
In reality it’s not quite as dramatic. It’s more like I just get really busy flinging everything in the skillet, stirring it around, trying to avoid any spitting oil (okay, that part is true), and not being able to hear anything my husband is saying because the vent for our stove is so ridiculously loud.
So, I honestly don’t make all that many stir-fries. Plus, I have an electric stove, and I think you really need a gas stove and a wok to make really good stir-fries, but that’s just my opinion.
I decided to try out this stir-fry recipe from Jamie Oliver, however, because it sounded interesting yet yummy, is really fast, and quite simple, really.
I wondered if such a simple and fast recipe could be really good or not, so I tried it out.
And it was really good!
It’s called Chicken Goujons with Noodles, but I call it Five Spice Chicken and Noodle Stir-fry. Whatever you call it, it’s definitely tasty, but not your average stir-fry. If you have a really busy night coming up, give this a try. The five spice powder gives it an intriguing flavor that’s delicious with the chicken. Did I mention it’s fast?

Five Spice Chicken and Noodle Stir-fry
(serves 2)
- 8 oz. dried flat egg noodles
- 3 Tbsp. peanut or canola oil (or any high heat cooking oil)
- 2 medium chicken breasts, cut into thin strips
- 1 thumb-sized piece of ginger, peeled and thinly sliced
- 1/2 tsp. dried red chili
- 2 tsp. five spice powder
- 5 – 6 green onions, sliced
- 2 Tbsp. soy sauce
- 1 Tbsp. honey
- large handful of cilantro, washed and roughly chopped
- Cook noodles according to package instructions (typically these only need to cook for a few minutes).
- Meanwhile, heat oil in a large skillet over high heat. Add the chicken, ginger, and chili. Stir around quickly, then add the five spice powder.
- Once the chicken is browned, add the green onions, soy sauce, and honey, and mix everything.
- Add the drained noodles and cilantro to the skillet. Toss everything together, adjust the seasoning to taste (add more soy sauce, honey, or five spice powder as desired), and serve.
recipe adapted from Jamie Oliver’s Chicken Goujons with Noodles
Japanese Tofu Hamburger Steak (豆腐ハンバーグ)
If there’s one thing I love, it’s Japanese tofu hamburger steaks (called “tofu hanbahgu” or tofu hamburg).
Heck, there’s a lot of things I love from Japanese cuisine. Teriyaki salmon, inari sushi, sushi in general, grilled eel, curry rice, korokke, tempura, chestnut rice, kabocha… I could go on and on, but I’d probably start to drool. And then I would probably drive to the other end of Houston to the Japanese grocery store, buy half the store, rush home, and spend the rest of the day creating an elaborate over the top feast with enough food for 10 people… for my husband and I. So, I shall desist…
The best way to eat tofu hamburger steaks, in my opinion, is with daikon oroshi (simply, grated Japanese radish) and ponzu (a citrus-infused soy sauce condiment). If you’ve never seen a Japanese radish, they look like this…
They’re generally about a foot long, but their size and shape can vary immensely. You can find daikon at most Asian supermarkets. To make grated daikon, wash your daikon, peel off the outside layer like a carrot, and then….grate it….with a grater. Easy right? Just kidding. You don’t want strips of grated daikon like grated cheese, you want a finely minced daikon mush. Sounds yummy, right? Trust me, it is.
I use my Microplane zester, which works great, but you could even throw some daikon in your food processor and whiz it to a pulp (literally).
Once you’ve successfully grated as much daikon as you think you’ll need, drain off some of the excess liquid, and you’re done.
If you can’t find Japanese daikon, or you don’t want to be bothered to go to an Asian supermarket (or if you don’t have an Asian supermarket), you can use regular ol’ American radishes. Just be very careful when grating/zesting them, as they’re so small, you run a much larger risk of accidentally zesting your fingertips (yes, it can be done). Not a pretty picture. Exercise caution.
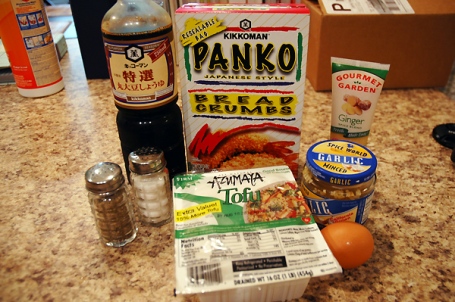
OK! First things first! Here’s the ingredients you need: 1 block of firm tofu, 1/2 onion (which I forgot to put in the picture; he’s anti-social), minced garlic, extra virgin olive oil (also anti-social), ginger paste, an egg, salt and pepper, and panko bread crumbs.
Mince the onion as finely as you can (you can even whiz it in the food processor to a pulp; that seems to be a theme today…), and saute it in a skillet over medium heat with the olive oil. After 2 – 3 minutes, add the garlic and continue sauteing until the onion is translucent, another 2 minutes or so.
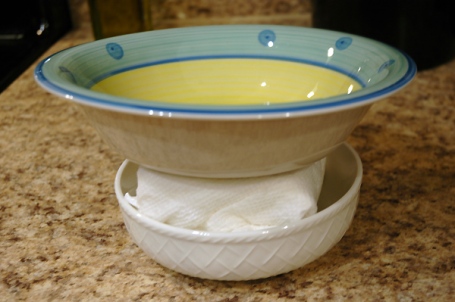
Meanwhile, swaddle wrap your tofu block in paper towels, place it on a plate or in a bowl, and place another, heavy dish on top, like so. Microwave it all for 3 – 4 minutes. This will help get rid of the excess water in the tofu.
Carefully unwrap the tofu, as it will be very hot by this point, and add it to a large bowl. Add the cooked onion and garlic, the ginger paste, the soy sauce, and a light dash of salt and pepper. Mix everything, crumbling up the tofu as much as possible. The best way to do this is with your hands. Go on. Get in their and get dirty! Just make sure you wash your hands before and after the tofu mushing. And make sure the tofu is sufficiently cooled, so you don’t burn your hands in your eagerness to smoosh it.
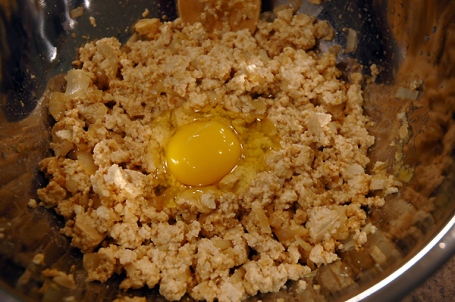
Once everything is well mixed, and the tofu is well smooshed and crumbly, add the egg, and mix it in. Then, add the bread crumbs, and mix it yet again. A spoon works fine for these last two additions.
Now, at this point, you can either cover and refrigerate the mixture for an hour; form it into patties, place those on a baking sheet, cover and refrigerate that for an hour; or form it into patties and and cook them immediately. I recommend one of the first two methods. By refrigerating it for an hour or more, it really allows the flavors to be absorbed into the tofu and will taste better as a result. If you’re in a hurry though, by all means, go for it!
Once you’re ready to cook the patties, add a little olive oil to a skillet over medium-high heat. Form the mixture into patties (if you haven’t already), and cook them, about four at a time, until browned on one side. Flip them, and continue cooking until they’re golden brown on that side as well. Remove the patties to a serving plate, and repeat with the remaining patties.
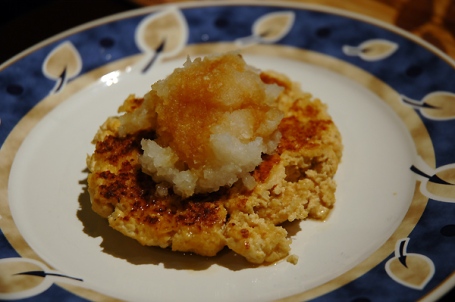
After cooking, they should look something like this.
To eat, spoon some of that delicious daikon oroshi you worked hard to get on top of a patty, then pour a little ponzu over the top (not too much, as it’s strong stuff). Then, enjoy.
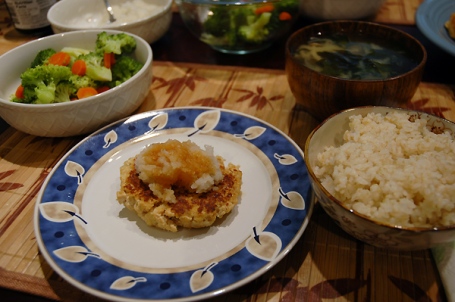
Serve with Japanese steamed rice, miso soup, and any other Japanese side dishes you want.
Japanese Tofu Hamburger Steaks
(makes about 10 patties)
- 1 (16 oz.) block of firm tofu
- 1/2 onion, finely diced
- 3 cloves minced garlic
- 1 Tbsp. extra virgin olive oil, plus more for cooking the patties
- 1 Tbsp. ginger paste
- 2 1/2 Tbsp. soy sauce
- light dash of salt and pepper
- 1 egg
- 1/2 c. panko bread crumbs
- 3/4 – 1 c. grated Japanese daikon (optional)
- Ponzu (optional)
- Heat olive oil in a skillet over medium heat. Cook the onion for 2 – 3 minutes. Add the garlic and cook for another 2 – 3 minutes. Remove from heat.
- Wrap tofu in paper towels and place on a plate. Place a heavier dish on top of the tofu, and microwave it all for 3 – 4 minutes.
- Carefully unwrap tofu and add it to a large bowl. Add the cooked onion and garlic, ginger paste, soy sauce, and a light dash of salt and pepper. Mix everything well with a large spoon or your hands. Add the egg and mix again, then add the bread crumbs and mix again. Cover the bowl and refrigerate it for one hour.
- Heat 1 – 2 Tbsp. of olive oil in a large skillet over med-high heat. Form the mixture into patties and cook, about four at a time, until browned on one side. Flip the patties cook on the remaining side until well browned. Remove to a serving plate, and repeat with the remaining patties.
- Serve with grated daikon and ponzu.
Vietnamese Shrimp Vermacelli Bowl
 I think I mentioned recently how I’ve been on a big Asian food kick recently. I always love Asian food, but I’ve been fixing it multiple times in a week recently.
One thing I recently discovered that I’ve fallen in love with, is vermicelli bowls. They have them at Vietnamese Pho restaurants, and if you’ve never had them, they’re awesome. They’re also a great alternative to pho in the summer time when you want something a little bit cooler.
If you don’t know what it is, usually you get a bowl of rice vermicelli noodles with some kind of marinated and grilled meat (or tofu) on top, along with lettuce, cucumber, pickled carrots and daikon, bean sprouts, chopped up peanuts, and often a chopped up egg roll or two. It usually comes with the famous Vietnamese fish dipping sauce, nuoc mam cham. I’ve also fallen in love with this sauce. It’s tangy, salty, spicy, and sweet all at the same time. It’s brilliant. And delicious. You pour the sauce over everything, mix it up a little, and enjoy the taste of heaven in your mouth…
As you can probably tell by now, I like this dish (no, really?). I don’t know how it took me 25 years to discover it. I decided I should try to make my own version at home, and while it may not be quite as wonderful as the vermicelli bowls you get in a restaurant, it’s still pretty dang good!
I adapted my recipe from the recipe I found on The Ravenous Couple, here.
The recipe may seem complicated with all the different parts, but it’s really not. It’s basically just adding the stuff to different bowls and mixing it up. It’s not hard! I promise!
I forgot to add the lettuce before I took these pictures. Doh! Because that’s how I roll…
Shrimp Vermicelli Bowls
(serves 2 – 3)
For the pickles:
- 1 c. carrot matchsticks
- 1 c. daikon matchsticks (or you can use sliced radishes if you couldn’t get your hands on a daikon, like me)
- white distilled vinegar
- salt
- sugar
For the fish dipping sauce, nuoc mam cham:
- 1/2 c. water
- 1 Tbsp. white or rice vinegar
- 2 Tbsp. fresh lime juice
- 2 Tbsp. sugar
- 1 chile, diced, or 1/2 tsp. red pepper flakes (more or less to taste)
- 2 cloves minced garlic
- 1/8 c. fish sauce (add more or less to taste)
For the marinade:
- 1/4 c. minced lemon grass (you can leave this out if you can’t find it)
- 1/4 c. sugar
- 2 Tbsp. fish sauce
- 1/2 tsp. black pepper
- 3 cloves minced garlic
- 2 – 3 green onions, diced
- 2 Tbsp. sesame oil
- 1 Tbsp. soy sauce
- 1 lb. raw shrimp, peeled and deveined
- 14 oz. rice vermicelli noodles
- 1/2 c. cucumber, cut into matchsticks
- 1 c. fresh bean sprouts (or canned if you can’t find them fresh)
- A few handfuls of leaf lettuce, torn into pieces
- 1/2 c. toasted peanuts, chopped
- A handful of fresh cilantro, chopped (optional)
- egg rolls (optional)
- First, make the pickles. Add the carrot and daikon matchsticks to a small bowl. Cover with vinegar until the vegetables are just covered. Add salt and sugar gradually, until the desired taste it reached. Note: you’ll need more sugar than salt, as the vinegar solution should be tart, sweet, and only a little salty. Cover and refrigerate at least one hour.
- Second, make the marinade. Add all the marinade ingredients to a bowl and mix well. Add the shrimp and mix until all the shrimp are well coated. Cover and refrigerate one or more hours (30 minutes minimum).
- Next, make the fish sauce. Mix all the ingredients in a small bowl. Adjust the seasoning to taste. Cover and refrigerate.
- Cook the vermicelli noodles according to the package instructions. Drain, rinse with cold water, and set aside.
- Cook the shrimp in a med-hot skillet or on a grill until completely cooked through.
- Divide the noodles into bowls. Place the cooked shrimp on top, along with the strained pickled carrots and daikon, cucumber, bean sprouts, lettuce, peanuts, and cilantro (if desired). Serve with the nuoc mam cham sauce and chopped up egg rolls if desired.
Spicy Thai Peanut Noodles with Shrimp
I’ve been on a big Southeast Asian food kick recently.
I always like Asian food, but recently I’ve been making it more often than usual.Especially Thai and Vietnamese food.
This recipe for Spicy Thai Peanut Noodles I originally found on Skinnytaste. I changed the chicken to shrimp and a few other things to suit my own tastes better.
If you want to make something Thai, but are tired of Pad Thai and curries (albeit it would be pretty hard to ever get tired of either of those in my opinion), these peanut noodles are a nice change.
I suggest you add the Sriracha sauce gradually to find the spicy level you’re most comfortable with. It can get pretty hot pretty fast with Sriracha sauce, but man, it’s so darn good. I love Sriracha sauce. Forget the Tabasco sauce. Give me Sriracha any day! Sriracha on pho, Sriracha on vermicelli bowls, Sriracha on spring rolls, Sriracha mixed with mayo on sandwiches…..
I digress.
Anyway, try out this noodles for a nice change from your regular Asian fare, and go as easy or as heavy on the Sriracha as you like. We don’t judge here. 🙂
Spicy Thai Peanut Noodles with Shrimp
(serves 5 – 6)
For the marinade:
- 1 Tbsp. soy sauce
- 1 Tbsp. ginger paste
- 2 cloves minced garlic
- 1 Tbsp. fresh lime juice
- 1/2 Tbsp. Sriracha sauce
- dash of salt and pepper
For the sauce:
- 1 3/4 c. chicken broth
- 5 Tbsp. natural peanut butter (not the sugar pumped kind)
- 2 Tbsp. honey
- 2 Tbsp. soy sauce
- 1 Tbsp. ginger paste
- 2 cloves minced garlic
- 1/2 Tbsp. Sriracha sauce (use more or less, depending on how spicy you want it)
- 1 lb. uncooked shrimp, peeled and deveined
- 1 Tbsp. peanut oil
- 8 oz. rice noodles
- 2 cloves minced garlic
- 3 green onions, diced
- 2 c. shredded broccoli slaw
- 1 c. fresh bean sprouts (optional)
- 1/4 c. chopped peanuts, toasted
- 1/2 tsp. sesame oil
- lime wedges and cilantro for garnish (optional)
- Combine the marinade ingredients in a bowl. Add the shrimp, and mix until the shrimp is well coated. Cover and let marinade for about 30 min. to 1 hour.
- In a saucepan over medium heat, add the sauce ingredients. Heat slowly, stirring occasionally until sauce becomes smooth, about 5 – 8 minutes. Set aside.
- Boil noodles according to package instructions.
- Meanwhile, heat a large wok or skillet over high heat. Add peanut oil. Add the shrimp and saute, stirring constantly, until completely cooked, about 2 – 3 minutes. Remove from wok.
- Add garlic, scallions, broccoli slaw, and bean sprouts to wok. Saute, stirring constantly, for 1 – 2 minutes, until slightly tender, but still crisp. Remove from wok.
- Drain cooked noodles and return to pot. Add the sauce, shrimp, and stir-fried vegetables to the pot. Mix until everything is well coated. Divide noodles between individual bowls. Sprinkle with toasted peanuts and cilantro (optional), and serve with a lime wedge.
Sesame Chicken (the non-deep fried version)
The weather has been so nice this week (high temp around 80° F), that Hisa and I decided to get out of the house and go somewhere yesterday. I’d been wanting to go to the zoo, so we decided to go there.
It was the perfect day for it. It was warm and sunny with some clouds, but not so warm it was hot and uncomfortable. Since the weather was nice, most of the animals were out (if you’ve ever gone to the zoo in the summer when it’s hot, then you probably know that many of the animals are in their dens asleep, where you can’t see them), which was nice.
I’ve always loved animals and going to zoos. It reminds me of my childhood dream to be a zoologist. That is until I discovered that zoologists have to take a huge number of science courses in college. I kinda changed my mind after that…
Still, it was a lot of fun seeing the animals, and just getting out of the house and enjoying the weather.
After the zoo, we got coffee, checked out our favorite used bookstore, and headed home. It was a fun day. With lots of cute, fuzzy animals. That’s hard the beat in my opinion. 🙂
Sesame chicken is probably my favorite American Chinese buffet dish, in all of its fried, artificial, and unhealthy glory. Terrible, I know. It’s still my favorite though. Even if I only eat it once in a blue moon.
I’ve been gradually trying to expand my repertoire of Chinese dishes I can cook, so I decided to try my hand at sesame chicken this week (albiet, a somewhat healthier version).
The breading of this chicken doesn’t have the same uniform texture of deep fried sesame chicken, but it’s still really good. I also didn’t make it as sweet as restaurant style sesame chicken, but feel free to adjust the sweetness level to your own tastes.
First, mix up your marinade ingredients: 1 egg, 2 Tbsp. soy sauce, 1 Tbsp. cooking sake (or cooking wine if you don’t have it), a couple drops of sesame oil, 2 Tbsp. unbleached flour, 2 Tbsp. corn starch, 2 Tbsp. water, 1/4 tsp. baking powder, and 1/4 tsp. baking soda.
Cut up 3 – 4 chicken breast into bite sized pieces, mix it with the marinade until it’s well coated, and let it marinate for about 20 minutes.
Meanwhile, mix up your sauce ingredients: 1/2 c. water, 1 c. chicken broth, 1/4 c. white vinegar, 3 Tbsp. corn starch, 1/3 c. sucanat (or honey or sugar), 2 Tbsp. soy sauce, 1/8 tsp. sesame oil, 1 tsp. chili paste (more if you want it hot), 1/4 tsp. garlic powder, and 1/2 tsp. onion powder.
Boy, doesn’t that look yummy?! Ahahaha…
 Heat a couple tablespoons of extra virgin olive oil (or peanut oil if you have it) in a large skillet over medium-high heat. Add the chicken, and let it cook on one side until well browned, then flip it, and let it cook on the other side.
Once you’ve browned the chicken pieces on both sides, you can chop it up so the pieces aren’t sticking to each other, and stir-fry it around until it’s cooked through.
Once the chicken is cooked through, pour on enough sauce to coat the chicken well (Don’t drown it. I had extra), mix it well, and continue stirring it around until the sauce thickens to consistency you want. Add about 2 Tbsp. toasted sesame seeds, and mix them up well.
Serve with steamed rice, and any other chinese dishes you want. I served the sesame chicken with rice and my sweet and sour vegetable stir-fry.
Sesame Chicken
(serves 4)
- 3 – 4 chicken breasts
Marinade:
- 1 egg, beaten
- 2 Tbsp. soy sauce
- 1 Tbsp. cooking sake
- Around 3 drops sesame oil
- 2 Tbsp. unbleached flour
- 2 Tbsp. arrowroot powder or cornstarch
- 2 Tbsp. water
- 1/4 tsp. baking powder
- 1/4 tsp. baking soda
Sauce:
- 1 c. chicken broth
- 1/2 c. water
- 1/4 c. white vinegar
- 3 Tbsp. arrowroot powder or corn starch
- 1/3 c. sucanat, honey, or sugar
- 2 Tbsp. soy sauce
- 1/8 tsp. sesame oil
- 1 tsp. chili paste
- 1/2 tsp. onion powder
- 1/4 tsp. garlic powder
- 2 – 3 Tbsp. extra virgin olive oil (or peanut oil)
- 2 Tbsp. sesame seeds, toasted
- Mix the marinade ingredients. Cut chicken breasts into bite-sized pieces, and mix with marinade until well coated. Let marinate for about 20 minutes.
- Meanwhile, mix the sauce ingredients in a bowl.
- Heat oil in a large skillet over medium-high heat. Add chicken. Cook on one side, without stirring, until well browned, about 5 minutes. Flip, and cook on the opposite side, without stirring, until well browned. Stir-fry chicken until completely cooked through, another 5 – 10 minutes.
- Pour enough sauce on chicken so that it is well coated (you may not need all). Stir constantly until sauce thickens to the desired consistency. Adjust sauce seasoning to taste (add more sugar or chili paste if desired).
- Sprinkle on sesame seeds and mix well.
- Serve with steamed rice.


